PedroGeoGISdev wiki
  • Home
  • Linux OS
    • Linux: concepts
    • Linux: basic concepts
    • Linux: Bash
    • Linux: su and sudo
    • Linux: pipes
    • Linux: File System
    • Linux: Virtual Machines

    • Linux: distros
    • Linux Distros: Ubuntu
    • Linux Distros: Mint
    • Linux Distros: Debian
    • Linux Distros: openSuse
    • Linux Distros: Manjaro
    • Linux Distros: Red Hat Enterprise

    • Linux: laboratories
    • Linux Lab#LI01-1: Choose Linux
    • Linux Lab#LI01-2: Install at least three distributions
    • Linux Lab#LI01-3: Adjust user permissions
    • Linux Lab#LI02-1: Export env user with grep and pipe
    • Linux Lab#LI03-1: Manage users and groups
    • Linux Lab#LI03-2: Manage files
    • Linux Lab#LI03-3: Manage software
    • Linux Lab#LI03-4: Manage hardware
    • Linux Lab#LI04-1: Bash scripting, qtool
    • Linux Lab#LI04-2: Bash scripts as terminal tool
    • Linux Lab#LI04-3: Distribute the terminal app

    • Linux readings
    • Linux Resources
  • DevOps
    • What is DevOps
    • DevOps: Introduction
    • DevOps: Agile and Microservices
    • Infrastructure as code (IaC)
    • Immutable Infrastructure
    • Software Lifecycle

    • Documentation
    • How to document: Quarto and Obsidian

    • Network protocols
    • Network: Basics
    • Network: Client-server
    • Network Protocols
    • Network: DNS
    • Network: API Rest
    • Network: gRPC
    • Network: Websocket
    • Network: SMTP
    • Network: Ping
    • Network: UDP
    • Network: webhook
    • Network: SOAP
    • Network: graphQL

    • Version Control
    • Git
    • GitHub
    • Idea and GitHub 2023
    • Git and GitHub 2023 CLI

    • IDEs
    • IDE: Visual Code
    • IDE: IntellJIdea

    • DevOps tools
    • Amazon Web Services AWS
    • Docker
    • Jenkins pipelines
    • Kubernetes k8s
    • Digital Ocean
    • Nagios
    • Ansible

    • DevOps Laboratories
    • Lab 1: chat App
    • Lab 2: Spring Boot AWS AEB manually
    • Lab 3: Spring Boot and AWS S3 publisher
    • Lab 4: Spring Boot Docker/Jenkins
    • Lab 5: k8s on Digital Ocean
    • Lab 6: Spring Boot AWS codecommit

    • DevOps readings
    • DevOps Resources
  • MarkUp
    • MarkUp Languages
    • Introduction Markup
    • HTML Markup
    • Markdown Markup
    • Markdown and HTML working together, good idea?

    • Quarto Markdown
    • Quarto Markdown: basics
    • Quarto Markdown: creating
    • Quarto Markdown: publishing
    • Quarto Markdown: code & data
    • Quarto Markdown: api rest call
    • Quarto Markdown: OJS Cells
    • Quarto Markdown: cheat-sheet

    • Styling: CSS
    • Cascade Style Sheet
    • Cascade Style Sheet: Box Model and Containers
    • CSS: W3.css

    • MarkUp Languages Laboratories
    • Lab#MD01-1: Create and publish by Quarto

    • MarkUp Languages readings
    • MarkUp Languages Resources
  • Java SE
    • What is Java SE
    • Java Standard Edition: Basics
    • Java Standard Edition: Principles
    • Java MOOC Helsinki
    • Java MOOC Helsinki Syllabus

    • Java Create Project
    • Java SE: Maven
    • Java SE: Create Maven Project
    • Java SE: Project push GitHub
    • Java SE: JUnit and TDD

    • Java Concepts
    • Java SE: Class and Objects
    • Java SE: Scope
    • Java SE: static modifier
    • Java SE: Coupling and DDD
    • Java SE: Packages
    • Java SE: Abstract/Interface
    • Java SE: Java 8

    • Java Principles
    • Java SE: Encapsulation
    • Java SE: Abstraction
    • Java SE: Inherence
    • Java SE: Polymorphism

    • Java Design Patterns
    • Java Patterns: UML
    • Java Patterns: Types
    • Singleton
    • Factory
    • Abstract Factory
    • Builder
    • Facade
    • Bridge
    • Decorator
    • Composite
    • Observer
    • Strategy
    • State
    • Commander

    • Java SE Laboratories
    • Lab#SE00-1: Maven Person
    • Lab#SE00-2: Maven Clinic
    • Lab#SE00-3: Library Model
    • Lab#SE00-4: Abstract/Interface Human
    • Lab#SE01-1: Maven/Gradle Person and Account
    • Lab#SE01-2: Maven/Gradle Person and Account stored in JSON
    • Lab#SE02-1: Movie/Review, Model
    • Lab#SE02-2: Movie/Review, CRUD Operations
    • Lab#SE02-3: Movie/Review, factory
    • Lab#SE02-4: Movie/Review, interactivity and coupling
    • Lab#SE02-5: Movie/Review, simulate interactivity by console
    • Lab#SE03-1: Library/Book, Core-Model
    • Lab#SE03-2: Library/Book, Sprint Zero
    • Lab#SE03-3: Library/Book, Expand Model
    • Lab#SE04-1: healthyFood Restaurant, Core Model

    • Java SE readings
    • Java SE Resources
  • Python
    • Python Basics
    • Python: Basic Concepts
    • Python: Tips
  • JavaScript
    • JavaScript Basics
    • JavaScript: Basic Concepts
    • JavaScript: Tips
  • Spring
    • Spring Legacy
    • Spring Framework
    • Spring MVC
    • Springs Servlets

    • Spring Boot Basics
    • Spring Boot: fundamentals
    • Spring Boot: create a Project
    • Spring Boot: H2 DB and Thymeleaf
    • Spring Boot: cycle

    • Spring Boot Concepts
    • Spring Boot: Dependency Injection
    • Spring Boot: Annotations
    • Spring Boot: Controller
    • Spring Boot: View
    • Spring Boot: Thymeleaf
    • Spring Boot: Vaadin Flow
    • Spring Boot: Vaadin Hilla
    • Spring Boot: Model
    • Spring Boot: Rest
    • Spring Boot: Data & DB
    • Spring Boot: JPA & DI
    • Spring Boot: JPA Mappings
    • Spring Boot: JPA Relationships
    • Spring Boot: JPA Queries
    • Spring Boot: JPA Inherence
    • Spring Boot: Scaling

    • Spring Boot Laboratories
    • Lab#SB00-1: Library UML
    • Lab#SB00-2: CRUD User
    • Lab#SB00-3: LibraryManagement
    • Lab#SB00-4: API Rest
    • Lab#SB00-5: Rest & JPA-H2
    • Lab#SB00-6: Rest & MongoDB
    • Lab#SB00-7: Styling
    • Lab#SB01-1: DataBase
    • Lab#SB02-1: JPA Relationships
    • Lab#SB03-1: APIs & cloud
    • Lab#SB04-1: JPA Inherence
    • Lab#SB05-1: API Rest
    • Lab#SB06-1: employeeCourse
    • Lab#SB07-1: monitor Book
    • Lab#SB08-1: Restaurant UML
    • Lab#SB08-2: Vaadin
    • Lab#SB08-3: H2 and API Rest
    • Lab#SB08-4: JPA
    • Lab#SB08-5: Test API Rest
    • Lab#SB09-1: SpringIO Conference

    • Spring Boot readings
    • Spring Boot Resources
  • ReactJS
    • ReactJS: Principles
    • React JS: Introduction
    • React JS: render virtual DOM
    • React JS: Create a React project
    • React JS: Components
    • React JS: JSX
    • React JS: props and state

    • JavaScript: web scripting
    • JavaScript: basics
    • JavaScript: functions
    • JavaScript: objects
    • JavaScript: variables
    • JavaScript: flux control

    • ES6: ECMAScript 6
    • React JS ES6: arrow functions
    • React JS ES6: import modules
    • React JS ES6: array, data and key
    • React JS ES6: destructuring
    • React JS ES6: spread operator

    • ReacJS 18: Hooks
    • React JS: Rules of Hooks
    • ReactJS: useState
    • React JS: useReducer
    • React JS: useRef
    • React JS: useEffect
    • React JS: useContext
    • ReactJS: useMemo
    • ReactJS: custom hooks

    • ReactJS: Designing an App
    • React JS App: async
    • React JS App: events
    • React JS App: router
    • React JS App: conditional render
    • React JS App: styling

    • React JS: Laboratories
    • Lab#RE01-1: API Rest Axios
    • Lab#RE02-1: Router & Hooks
    • Lab#RE03-1: to-do app
    • Lab#RE03-2: HighCharts
    • Lab#RE03-3: API Rest Mono
    • Lab#RE03-4: API Rest Domains
    • Lab#RE03-5: data management
    • Lab#RE04-1: todo & server
    • Lab#RE04-2: Spring Boot & ReactJS
    • Lab#RE05-1: chat & websockets
    • Lab#RE05-2: chat: backend
    • Lab#RE05-3: chat & AWS
    • Lab#RE05-4: chat: test ws AWS
    • Lab#RE05-5: chat & front
    • Lab#RE05-6: chat & ws: front
    • Lab#RE06-1: healthyFood Restaurant
    • Lab#RE06-1-PR: create a pull request
    • Lab#RE07-1: traffic lights simulation

    • React JS readings
    • ReactJS Resources
  • Learning
    • Vocabulary
    • General Vocabulary
    • SCRUM Vocabulary
    • DevOps Vocabulary
    • Java SE Vocabulay
    • Spring Boot Vocabulary
    • DataBase Vocabulary
    • ReactJS Vocabulary
    • Web Vocabulary

    • Learning
    • Useful Questions
    • Learning: tips
    • Writing
    • Taking Notes
    • Comments
    • Document
    • Auto-Evaluate

    • Books & Articles
    • Books
    • Articles

    • What is SCRUM
    • SCRUM Agile Methodology
    • Agile Manifesto & Values
    • SCRUM Guide

    • Scrum Steps
    • Meetings, Impediments and Iterations
    • User stories, Tasks and Habits
    • Delivering Value & Communication
    • ScrumMaster, how it works
    • Mindset, the key to everything
    • Product Owner, how it works
    • Managing Time & Mind
    • Team & the Specialist
    • Albertus’ Dilemma
    • Before SCRUM
    • Team Dynamics
    • Emotions and Thoughts
    • Decision Making and Intuition
    • Beyond SCRUM
    • Balances, atmosphere and tools

    • Resources
    • SCRUM Resources
  • QGIS
    • QGIS basics
    • QGIS: basic concepts

    • QGIS laboratories
    • QGIS Laboratory 1: Introduction to Open Source GIS
  • ArcGIS Pro
    • ArcGIS Pro basics
    • ArcGIS Pro: basic concepts

    • ArcGIS Pro laboratories
    • ArcGIS Pro Laboratory 1: Getting Started
  • Bookmarks
    • Online Resources
    • Online Resources
  • About
    • About me and this site
    • About me
    • About this site
    • About images credit
  • Email
  • GitHub
  • LinkedIn
  1. Spring Boot Concepts
  2. Spring Boot: Thymeleaf
  • Spring

  • Spring Legacy
    • Spring Framework
    • Spring MVC
    • Springs Servlets

  • Spring Boot Basics
    • Spring Boot: fundamentals
    • Spring Boot: create a Project
    • Spring Boot: H2 DB and Thymeleaf
    • Spring Boot: cycle

  • Spring Boot Concepts
    • Spring Boot: Dependency Injection
    • Spring Boot: Annotations
    • Spring Boot: Controller
    • Spring Boot: View
    • Spring Boot: Thymeleaf
    • Spring Boot: Vaadin Flow
    • Spring Boot: Vaadin Hilla
    • Spring Boot: Model
    • Spring Boot: Rest
    • Spring Boot: Data & DB
    • Spring Boot: JPA & DI
    • Spring Boot: JPA Mappings
    • Spring Boot: JPA Relationships
    • Spring Boot: JPA Queries
    • Spring Boot: JPA Inherence
    • Spring Boot: Scaling

  • Spring Boot Laboratories
    • Lab#SB00-1: Library UML
    • Lab#SB00-2: CRUD User
    • Lab#SB00-3: LibraryManagement
    • Lab#SB00-4: API Rest
    • Lab#SB00-5: Rest & JPA-H2
    • Lab#SB00-6: Rest & MongoDB
    • Lab#SB00-7: Styling

    • Lab#SB01-1: DataBase
    • Lab#SB02-1: JPA Relationships
    • Lab#SB03-1: APIs & cloud
    • Lab#SB04-1: JPA Inherence
    • Lab#SB05-1: API Rest

    • Lab#SB06-1: employeeCourse

    • Lab#SB07-1: monitor Book

    • Lab#SB08-1: Restaurant UML
    • Lab#SB08-2: Vaadin
    • Lab#SB08-3: H2 and API Rest
    • Lab#SB08-4: JPA
    • Lab#SB08-5: Test API Rest

    • Lab#SB09-1: SpringIO Conference

  • Spring Boot readings
    • Spring Boot Resources

On this page

  • 1 Overview
  • 2 Configuration
  • 3 Passing data to views: @Controller and View
  • 4 Messages
  • 5 ThymeLeaf Templates Engine
  • 6 Fragments
  • 7 Layout
  • 8 CheatSheet
  • 9 Example1: Model
  • 10 Example2: @PathVariable and @RequestBody
  • 11 Example3: @RequestParam
  • 12 Thymeleaf
    • 12.1 ThymeLeaf Templates Engine
  • Edit this page
  • Report an issue
  1. Spring Boot Concepts
  2. Spring Boot: Thymeleaf

Spring Boot: Thymeleaf

Spring Boot View Thymeleaf

Spring-Boot
View
thymeleaf
In Spring Boot, the Model-View-Controller (MVC) pattern is used to separate the application logic into three components Model - View -Controller
Author

albertprofe

Published

Tuesday, June 1, 2021

Modified

Sunday, August 10, 2025

📘 Thymeleaf

Thymeleaf is a modern server-side Java template engine for both web and standalone environments.


Spring Boot Request-Response Cycle

Spring Boot Request-Response Cycle

1 Overview

Thymeleaf

Thymeleaf

Thymeleaf uses HTML attributes to add functionality and dynamic behavior to web pages, allowing for server-side rendering and template processing.

<p th:text="'Thymeleaf will display this'">text</p>

Here Thymeleaf will process the text inside the th:text attribute, and replace the contents of the <p> tag with it.

Thymeleaf works by replacing the contents of the tags that its attributes are defined on. so the final in the browser output will be:

<p>Thymeleaf will display this</p>

Notice that the special attributes are now gone, as well as the text “text” which is now replace with the contents of the Thymeleaf attribute.

A more complicated example:

<tr th:each="prod : ${prods}">
    <td th:text="${prod.name}">Onions</td>
    <td th:text="${prod.price}">2.41</td>
<tr>

Here Thymeleaf will repeat the <tr> with the list of products, this is defined by the attribute th:each, it will also remove the dummy content in both the <td> tags, and replace them with the content that is evaluated from th:text="${prod.name}" and th:text="${prod.price}".

2 Configuration

In order to use thymeleaf in a project, we need to add the following starter to the dependency:

<dependency>
    <groupId>org.springframework.boot</groupId>
    <artifactId>spring-boot-starter-thymeleaf</artifactId>
</dependency>

The starter spring-boot-starter-thymeleaf added to the project, thanks to the auto-configuration mechanism. Default values include:

  • HTML templates should be in the resources/templates directory (this is the so-called root)
  • files should have the html extension (so we won’t have to duplicate this information in the code)
  • viewResolver has an appropriate implementation (thymeleafViewResolver)

3 Passing data to views: @Controller and View

The @Controller will return a String object: it will display an HTML view with the appropriate message at the address:

http://localhost:8080/

Thymeleaf allows you to define templates of HTML views. In order to be able to use additional Thymeleaf functionalities we need to add the appropriate **namespace** to the HTML document (and the html tag):

xmlns:th=“http://www.thymeleaf.org”

NoteDefine the places to replace in the HTML template as follows:

in the tag we indicate the attribute that should be replaced with the name. We precede this attribute with the name namespace and the character :, e.g.:

<p th:text=...></p>

indicate the value to be replaced inside the braces and precede it with a dollar sign, e.g. ${myCustomAttributeName}

4 Messages

Thymeleaf by default allows you to define such messages in the messages.properties file, which by default should be located directly in the resources directory.

In this file we store the keys and the corresponding values. In the HTML template, we refer to the key using the # sign:

hi.msg=Hi there!

<!DOCTYPE html>
<html lang="en" xmlns:th="http://www.thymeleaf.org">
<body>
    <p th:text="#{hi.msg}"></p

    <a href="?lang=fr">Français</a>

</body>
</html>

In application.properties, we should define locale:

spring.mvc.locale=en

We could add another language by creating a new file named messages_fr.properties (messages_cat.properties, messages_es.properties, messages_ja.properties) in the same directory.

  • resources (examples)

This approach also allows the implementation of internationalization by means of the so-called interceptors:

@Bean
public LocaleResolver localeResolver() {
    SessionLocaleResolver resolver = new SessionLocaleResolver();
    resolver.setDefaultLocale(Locale.ENGLISH);
    return resolver;
}

@Bean
public LocaleChangeInterceptor localeChangeInterceptor() {
    LocaleChangeInterceptor interceptor = new LocaleChangeInterceptor();
    interceptor.setParamName("lang");
    return interceptor;
}

@Override
public void addInterceptors(InterceptorRegistry registry) {
    registry.addInterceptor(localeChangeInterceptor());
}

5 ThymeLeaf Templates Engine

Most Thymeleaf attributes allow their values to be set as or containing expressions, which we will call Standard Expressions because of the dialects they are used in. These can be of five types:

NoteThymeleaf expressions
  • ${…} : Variable expressions.
  • *{…} : Selection expressions.
  • #{…} : Message (i18n) expressions.
  • @... : Link (URL) expressions.
  • ~{…} : Fragment expressions.
  • __{…} : use an element inside another

Attributes th:

NoteThymeleaf attributes
  • message: <p th:text="#{msg.welcome}">Welcome everyone!</p>
  • list: <li th:each="book : ${books}" th:text="${book.title}">En las Orillas del Sar</li>
  • link: <form th:action="@{/createOrder}">
  • action: <input type="button" th:value**="#{form.submit}" />
  • path: <a th:href="@{/admin/users}">

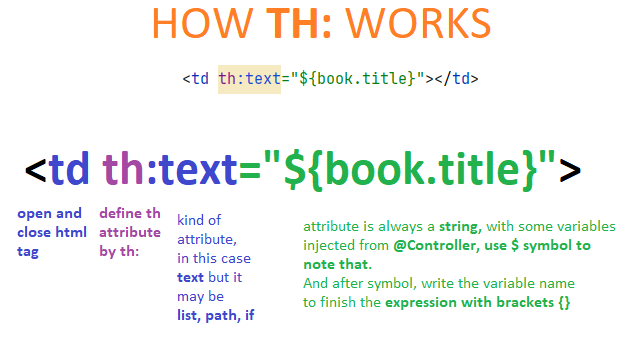
How to write th:
ThymeLeaf how TH: works (1/3)

ThymeLeaf how TH: works (1/3)

6 Fragments

  • Thymeleaf Views: fragments
  • employeeCourse repository

Using fragments in Thymeleaf can make it easier to maintain and update web pages, as changes to a fragment will be reflected in all pages that include it.

In Thymeleaf, a fragment is a reusable piece of a web page that can be included in multiple pages. It can contain HTML markup, Thymeleaf expressions, and other Thymeleaf features.

Fragments are defined in Thymeleaf using the th:fragment attribute, which is added to any HTML element.

The value of the attribute is the name of the fragment. For example:

<div th:fragment="header">
   <h1>Welcome to my website!</h1>
</div>

This defines a fragment called “header” that contains a heading element. This fragment can then be included in other pages using the th:replace or th:include attributes.

For example:

<html>
   <body>
      <div th:replace="fragments/header :: header"></div>
      <p>This is the content of my page.</p>
   </body>
</html>

This code includes the “header” fragment in the page using the th:replace attribute. The :: syntax is used to specify the fragment name, and the fragments/header prefix specifies the location of the fragment file.

7 Layout

  • employeeCourse repository

Using the Layout Dialect can make it easier to maintain a consistent layout across your web pages, and simplify the process of creating new pages.

Thymeleaf Layout Dialect is a third-party dialect that provides a way to define a common layout for a set of web pages in Thymeleaf.

With the Layout Dialect, you can define a template that contains the common structure and layout of your web pages, and then include the content of each page in the appropriate section of the template.

To use the Layout Dialect, you need to add the dialect dependency (for Maven):

<dependency>
   <groupId>nz.net.ultraq.thymeleaf</groupId>
   <artifactId>thymeleaf-layout-dialect</artifactId>
   <version>2.5.1</version>
</dependency>

Once you have added the dependency, you can use the Layout Dialect in your Thymeleaf templates. Here’s an example of how to define a layout:

<!DOCTYPE html>
<html>
   <head>
      <title>My Website</title>
   </head>
   <body>
      <header th:replace="fragments/header :: header"></header>
      <div layout:fragment="content"></div>
      <footer th:replace="fragments/footer :: footer"></footer>
   </body>
</html>

This template defines a layout that includes a header and a footer. The layout:fragment attribute is used to define a section where the content of each page will be included.

To use this layout in a page, you can create a new template that includes the layout and defines the content:

<!DOCTYPE html>
<html xmlns:layout="http://www.ultraq.net.nz/thymeleaf/layout">
   <head>
      <title>My Page</title>
   </head>
   <body>
      <div layout:decorator="layout/template">
         <div layout:fragment="content">
            <p>This is the content of my page.</p>
         </div>
      </div>
   </body>
</html>

This page includes the layout by setting the layout:decorator attribute to the path of the layout template. The content of the page is defined inside the layout:fragment attribute.

8 CheatSheet

Thymeleaf CheatSheet
Feature Description Syntax
th:text Sets the text of an element <p th:text="${someValue}">Default Text</p>
th:if Conditionally renders an element <p th:if="${someCondition}">Visible when condition is true</p>
th:each Loops over a collection and renders an element for each item <ul><li th:each="item : ${items}" th:text="${item}">Default Text</li></ul>
th:object Binds a form to an object and sets its properties <form th:object="${user}"><input th:field="*{name}" /></form>
th:action Sets the URL for a form’s submission <form th:action="@{/submit}" method="post">
th:href Sets the URL for an anchor tag <a th:href="@{/page}">Link Text</a>
th:src Sets the source URL for an image tag <img th:src="@{/image.jpg}" alt="Alt Text" />
th:value Sets the value of an input field <input th:value="${someValue}" />
th:selected Conditionally selects an option in a select field <select><option th:selected="${isSelected}">Option Text</option></select>
th:disabled Conditionally disables an input field <input th:disabled="${isDisabled}" />
th:readonly Conditionally sets an input field as read-only <input th:readonly="${isReadOnly}" />
th:classappend Conditionally appends a CSS class to an element <div class="default" th:classappend="${additionalClass}"></div>
th:style Sets the style attribute of an element <div th:style="'background-color:' + ${bgColor} + ';'"></div>
th:attr Sets any attribute of an element <input th:attr="data-id=${itemId}" />
th:replace Replaces an element with another <div th:replace="fragments/header :: header"></div>
th:include Includes a fragment of a template <div th:include="fragments/footer :: footer"></div>
th:unless Conditionally renders an element when a condition is false <p th:unless="${someCondition}">Visible when condition is false</p>
th:inline Sets the inline mode of an element <script th:inline="javascript">alert([[${message}]]);</script>
th:textappend Appends text to an element <span th:textappend="${additionalText}">Default Text</span>
th:with Sets a local variable in the current context <div th:with="varName=${someValue}"></div>
  • A Cheat Sheet for using the Thymeleaf templating Engine
  • MVC and Thymeleaf

9 Example1: Model

<!DOCTYPE html>
<html xmlns:th="http://www.thymeleaf.org">
<head>
    <title>Home</title>
</head>
<body>
    <h1 th:text="${message}">Hello, World!</h1>
</body>
</html>

In this template, the th:text attribute is used to set the text of the <h1> tag to the value of the message attribute in the model. The expression ${message} evaluates to the value of the message attribute.

Assuming that this template is saved in a file named home.html in your application’s templates directory, the HomeController will render a message that says:

“Welcome to my Spring Boot app!”

when you visit theURL /

The value of the message attribute is set in the home() method of the controller.

Example1 Controller

10 Example2: @PathVariable and @RequestBody

Thymeleaf templates that can be used with the hello(), createUser(), and getUserById() methods:

hello.html

<!DOCTYPE html>
<html xmlns:th="http://www.thymeleaf.org">
<head>
    <title>Hello</title>
</head>
<body>
    <h1 th:text="${message}">Hello, World!</h1>
</body>
</html>

In this template, the th:text attribute is used to set the text of the <h1> tag to the value of the message attribute in the model. The value of message is set in the hello() method of the controller.

user.html

<!DOCTYPE html>
<html xmlns:th="http://www.thymeleaf.org">
<head>
    <title>User</title>
</head>
<body>
    <h1 th:text="${user.name}">User</h1>
    <p th:text="${user.email}"></p>
</body>
</html>

In this template, the th:text attribute is used to set the text of the <h1> tag to the value of the name property of the user object in the model.

The th:text attribute of the <p> tag is used to set its text to the value of the email property of the user object in the model.

Assuming that these templates are saved in files named hello.html and user.html, respectively, in your application’s templates directory, the hello() method will render a message that says:

“Hello, World!”

when you visit the URL /hello

The createUser() method doesn’t return a view, so it doesn’t need a Thymeleaf template.

Finally, the getUserById() method will render a page that displays the details of a user when you visit the URL /users/{id}, where {id} is the ID of the user.

The details of the user are passed to the template using the model.addAttribute() method.

The th:text attribute is used to set the text of the <h1> tag to the name of the user, and the th:text attribute of the <p> tag is used to set its text to the email of the user.

Example2 Controller

11 Example3: @RequestParam

<!DOCTYPE html>
<html xmlns:th="http://www.thymeleaf.org">
<head>
    <title>Example</title>
</head>
<body>
    <h1 th:text="'Hello, ' + ${message}">Hello, World!</h1>
</body>
</html>

In this template, the th:text attribute is used to set the text of the <h1> tag to the value of the message attribute in the model.

The expression 'Hello, ' + ${message} concatenates the string "Hello, " with the value of the message attribute.

Assuming that this template is saved in a file named hello.html in your application’s templates directory, the ExampleController will render a message that says:

For example, if you visit the URL /hello?name=John, the message will say “Hello, John!”.

“Hello, {name}!”

when you visit the URL:

/hello?name=John

where {name} is the value of the name parameter in the query string.

Example3 Controller

12 Thymeleaf

  • Library5 Documentation
  • Repo GitHub Code

12.1 ThymeLeaf Templates Engine

Most Thymeleaf attributes allow their values to be set as or containing expressions, which we will call Standard Expressions because of the dialects they are used in. These can be of five types:

NoteThymeleaf expresssions
  • ${…} : Variable expressions.
  • *{…} : Selection expressions.
  • #{…} : Message (i18n) expressions.
  • @... : Link (URL) expressions.
  • ~{…} : Fragment expressions.
  • __{…} : use an element inside another

Attributes th:

NoteThyemleaf attributes
  • message: <p th:text="#{msg.welcome}">Welcome everyone!</p>
  • list: <li th:each="book : ${books}" th:text="${book.title}">En las Orillas del Sar</li>
  • link: <form th:action="@{/createOrder}">
  • action: <input type="button" th:value**="#{form.submit}" />
  • path: <a th:href="@{/admin/users}">

How to write th:

ThymeLeaf how TH: works (1/3)

ThymeLeaf how TH: works (1/3)

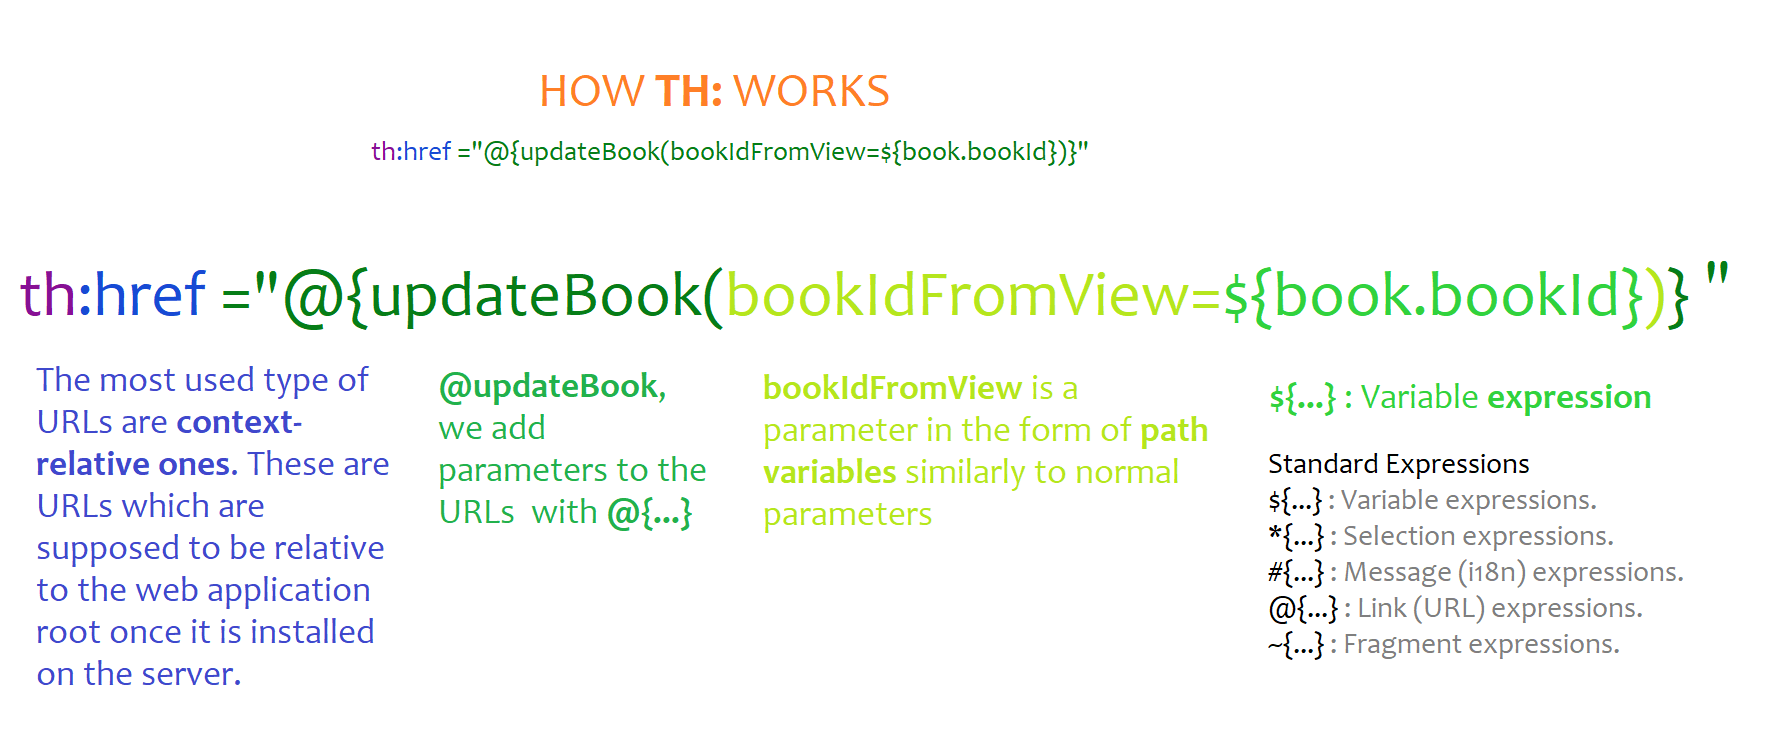
ThymeLeaf how TH: works (2/3)

ThymeLeaf how TH: works (2/3)

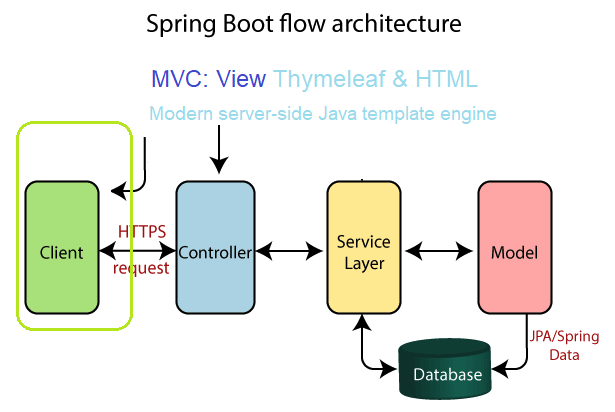
ThymeLeaf how TH: works (3/3)

ThymeLeaf how TH: works (3/3)
Back to top
Spring Boot: View
Spring Boot: Vaadin Flow

This website is built with Quarto.

Difficulties are just things to overcome, after all. Ernest Shackleton

  • Edit this page
  • Report an issue