Lab#RE05-5: chat & front
ReactJS labs
📘 React JS Lab#RE05-5: chat & websockets
In this lab, we will be using:
- the
react-router-dom, which is a package with bindings for using React Router in web applications: websockets, provided by ReactJS framework and:- useState
- useEffect
- useContext
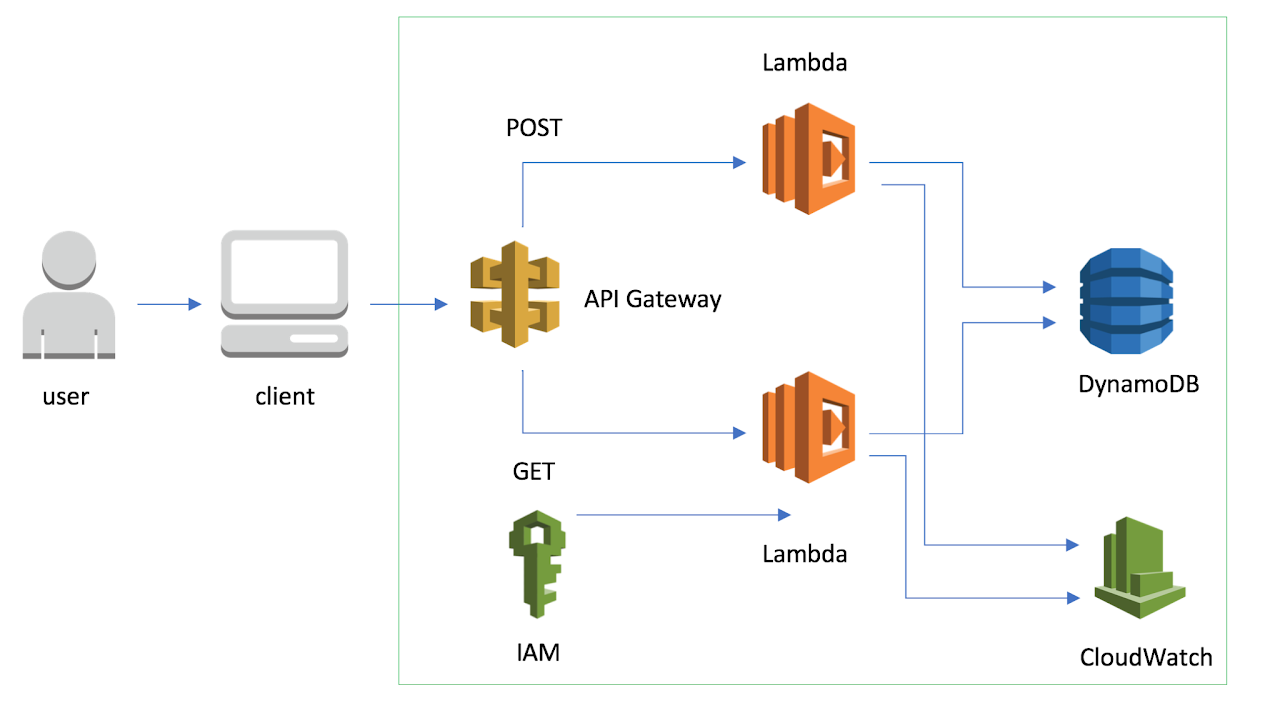
AWS, Amanzon Web Services, architecture as a server-side:- Lambda
- DynamoDB
- API Gateway
- Cloudwatch
Reference:
1 Frontend: ReactJS
Let’s now to create the front-end of myChat App with ReactJS and websockets.
1.1 Websockets JS
We can use the newly created WebSocket *by utilizing the lifecycle methods and state management provided by the framework.
Here’s a general outline of how you can incorporate WebSockets in a React component:
Inside your component, initialize the WebSocket connection with the useEffect hook.
ToDoService.js
Add event listeners to handle WebSocket events such as onopen, onmessage, onclose, and onerror. For example:
ToDoService.js
socket.onopen = () => {
  console.log("WebSocket connection established.");
};

socket.onmessage = (event) => {
  console.log("Received message:", event.data);
  // Update React state or trigger necessary actions
  //based on the received message
};

socket.onclose = () => {
  console.log("WebSocket connection closed.");
};

socket.onerror = (error) => {
  console.error("WebSocket error:", error);
};
Inside your component, you can interact with the WebSocket connection as needed. For example, you can send messages using the send method:
ToDoService.js
Update the component’s state or trigger necessary actions based on the received messages. We can use React’s state management, such as useState, to store and update data in response to WebSocket events or a useContext to manage data.
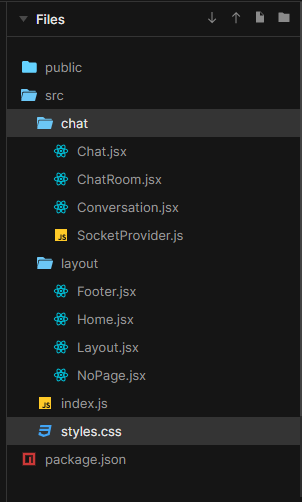
1.2 Mock-up and tree-folder
2 User Stories
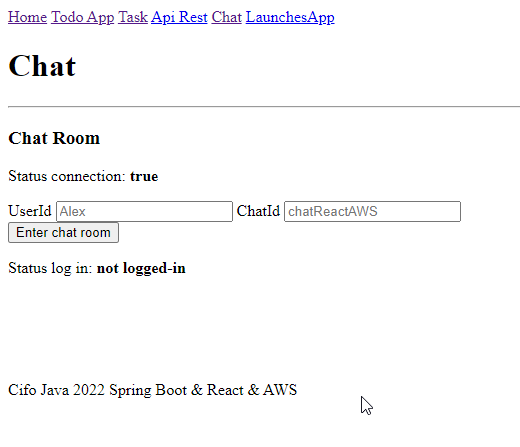
User Story 1 - Connecting to the Chat Server: As a user, I want to be able to connect to the chat server so that I can participate in the chat room. When I open the application, I should see a UI indicating that I am connected to the server. If the connection fails, I expect to see an error message informing me about the issue.
User Story 2 - Logging In to the Chat Room: As a user, I want to log in to the chat room with my user ID and chat ID. When I open the application and I am not logged in, I should see a login form where I can enter my user ID and chat ID. After entering my login credentials, I expect the application to verify the login information. If the login is successful, I should see a UI indicating that I am logged in. If the login fails, I want to see an error message explaining the reason.
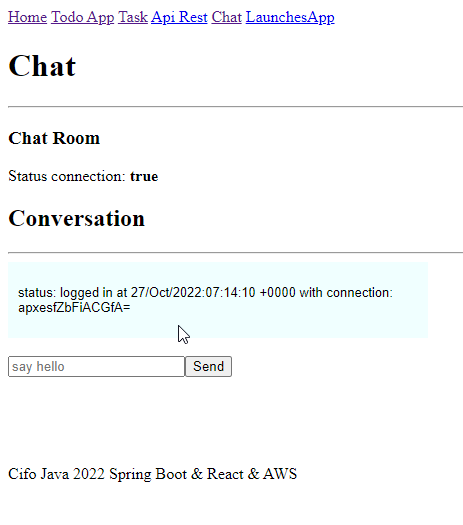
User Story 3 - Participating in the Conversation: As a logged-in user, I want to be able to send and receive messages in the chat room. After successfully logging in, I should see an input field where I can type my messages. When I send a message, it should be displayed in the conversation UI along with the messages from other participants. I expect to see real-time updates of the conversation as new messages are sent and received.
3 Use Cases
3.1 Use Case 1: Connection
Actor: User
Preconditions: - The user has opened the chat application.
Main Flow: 1. The user launches the chat application. 2. The application establishes a WebSocket connection to the server. 3. The application displays the status of the connection as “connected” to the user.
Postconditions: - The user is connected to the chat server and ready to send and receive messages.
3.2 Use Case 2: Log In
Actor: User
Preconditions: - The user has opened the chat application. - The user is not logged in.
Main Flow: 1. The user enters their user ID and chat ID in the input fields provided. 2. The user clicks the “Enter chat room” button. 3. The application sends the login data (user ID and chat ID) to the server. 4. The server verifies the login data and sends a response to the application. 5. The application receives the response and updates the UI accordingly, displaying the login status to the user.
Alternate Flow (Invalid Login): - If the login data is invalid or the server rejects the login, the application displays an error message to the user.
Postconditions: - The user is logged into the chat room and ready to participate in conversations.
3.3 Use Case 3: Conversation
Actor: User
Preconditions: - The user is logged into the chat room.
Main Flow: 1. The user enters a message in the input field provided. 2. The user clicks the “Send” button. 3. The application sends the message to the server. 4. The server receives the message and broadcasts it to all connected users in the chat room. 5. The application receives the broadcasted message and updates the conversation UI to display the new message.
Postconditions: - The user’s message is sent and visible in the conversation to all participants in the chat room.
4 Conditional Render to manage UI user states
connected,log inandconversation.
We will use Conditional rendering to manage the triple state of “connected,” “log in,” and “conversation.” Here’s a brief study to code:
Connected State: When the application is connected to the chat server, it displays the UI that shows the user as “connected.” This is achieved by checking if the WebSocket connection has been established and updating the UI accordingly.
Log In State: If the user is not logged in, the code renders the login form where the user can enter their user ID and chat ID. Once the user submits the login form, the code sends the login data to the server for verification. If the login is successful, the UI is updated to display the login status. If the login fails, an error message is displayed.
Conversation State: Once the user is logged in, the code allows the user to enter messages in the input field and send them to the server. When a message is sent, it is broadcasted to all participants in the chat room. The application receives the broadcasted message and updates the conversation UI to display the new message.
To implement this conditional rendering, the code uses:
- if statements,
- ternary operators,
- or logical operators to check the current state and
- conditionally render the appropriate components or UI elements.
This allows for a dynamic user experience based on the different states of the chat application.
Note that the provided explanation is a simplified overview, and the actual implementation may involve more complex logic and components.