PedroGeoGISdev wiki
  • Home
  • Linux OS
    • Linux: concepts
    • Linux: basic concepts
    • Linux: Bash
    • Linux: su and sudo
    • Linux: pipes
    • Linux: File System
    • Linux: Virtual Machines

    • Linux: distros
    • Linux Distros: Ubuntu
    • Linux Distros: Mint
    • Linux Distros: Debian
    • Linux Distros: openSuse
    • Linux Distros: Manjaro
    • Linux Distros: Red Hat Enterprise

    • Linux: laboratories
    • Linux Lab#LI01-1: Choose Linux
    • Linux Lab#LI01-2: Install at least three distributions
    • Linux Lab#LI01-3: Adjust user permissions
    • Linux Lab#LI02-1: Export env user with grep and pipe
    • Linux Lab#LI03-1: Manage users and groups
    • Linux Lab#LI03-2: Manage files
    • Linux Lab#LI03-3: Manage software
    • Linux Lab#LI03-4: Manage hardware
    • Linux Lab#LI04-1: Bash scripting, qtool
    • Linux Lab#LI04-2: Bash scripts as terminal tool
    • Linux Lab#LI04-3: Distribute the terminal app

    • Linux readings
    • Linux Resources
  • DevOps
    • What is DevOps
    • DevOps: Introduction
    • DevOps: Agile and Microservices
    • Infrastructure as code (IaC)
    • Immutable Infrastructure
    • Software Lifecycle

    • Documentation
    • How to document: Quarto and Obsidian

    • Network protocols
    • Network: Basics
    • Network: Client-server
    • Network Protocols
    • Network: DNS
    • Network: API Rest
    • Network: gRPC
    • Network: Websocket
    • Network: SMTP
    • Network: Ping
    • Network: UDP
    • Network: webhook
    • Network: SOAP
    • Network: graphQL

    • Version Control
    • Git
    • GitHub
    • Idea and GitHub 2023
    • Git and GitHub 2023 CLI

    • IDEs
    • IDE: Visual Code
    • IDE: IntellJIdea

    • DevOps tools
    • Amazon Web Services AWS
    • Docker
    • Jenkins pipelines
    • Kubernetes k8s
    • Digital Ocean
    • Nagios
    • Ansible

    • DevOps Laboratories
    • Lab 1: chat App
    • Lab 2: Spring Boot AWS AEB manually
    • Lab 3: Spring Boot and AWS S3 publisher
    • Lab 4: Spring Boot Docker/Jenkins
    • Lab 5: k8s on Digital Ocean
    • Lab 6: Spring Boot AWS codecommit

    • DevOps readings
    • DevOps Resources
  • MarkUp
    • MarkUp Languages
    • Introduction Markup
    • HTML Markup
    • Markdown Markup
    • Markdown and HTML working together, good idea?

    • Quarto Markdown
    • Quarto Markdown: basics
    • Quarto Markdown: creating
    • Quarto Markdown: publishing
    • Quarto Markdown: code & data
    • Quarto Markdown: api rest call
    • Quarto Markdown: OJS Cells
    • Quarto Markdown: cheat-sheet

    • Styling: CSS
    • Cascade Style Sheet
    • Cascade Style Sheet: Box Model and Containers
    • CSS: W3.css

    • MarkUp Languages Laboratories
    • Lab#MD01-1: Create and publish by Quarto

    • MarkUp Languages readings
    • MarkUp Languages Resources
  • Java SE
    • What is Java SE
    • Java Standard Edition: Basics
    • Java Standard Edition: Principles
    • Java MOOC Helsinki
    • Java MOOC Helsinki Syllabus

    • Java Create Project
    • Java SE: Maven
    • Java SE: Create Maven Project
    • Java SE: Project push GitHub
    • Java SE: JUnit and TDD

    • Java Concepts
    • Java SE: Class and Objects
    • Java SE: Scope
    • Java SE: static modifier
    • Java SE: Coupling and DDD
    • Java SE: Packages
    • Java SE: Abstract/Interface
    • Java SE: Java 8

    • Java Principles
    • Java SE: Encapsulation
    • Java SE: Abstraction
    • Java SE: Inherence
    • Java SE: Polymorphism

    • Java Design Patterns
    • Java Patterns: UML
    • Java Patterns: Types
    • Singleton
    • Factory
    • Abstract Factory
    • Builder
    • Facade
    • Bridge
    • Decorator
    • Composite
    • Observer
    • Strategy
    • State
    • Commander

    • Java SE Laboratories
    • Lab#SE00-1: Maven Person
    • Lab#SE00-2: Maven Clinic
    • Lab#SE00-3: Library Model
    • Lab#SE00-4: Abstract/Interface Human
    • Lab#SE01-1: Maven/Gradle Person and Account
    • Lab#SE01-2: Maven/Gradle Person and Account stored in JSON
    • Lab#SE02-1: Movie/Review, Model
    • Lab#SE02-2: Movie/Review, CRUD Operations
    • Lab#SE02-3: Movie/Review, factory
    • Lab#SE02-4: Movie/Review, interactivity and coupling
    • Lab#SE02-5: Movie/Review, simulate interactivity by console
    • Lab#SE03-1: Library/Book, Core-Model
    • Lab#SE03-2: Library/Book, Sprint Zero
    • Lab#SE03-3: Library/Book, Expand Model
    • Lab#SE04-1: healthyFood Restaurant, Core Model

    • Java SE readings
    • Java SE Resources
  • Python
    • Python Basics
    • Python: Basic Concepts
    • Python: Tips
  • JavaScript
    • JavaScript Basics
    • JavaScript: Basic Concepts
    • JavaScript: Tips
  • Spring
    • Spring Legacy
    • Spring Framework
    • Spring MVC
    • Springs Servlets

    • Spring Boot Basics
    • Spring Boot: fundamentals
    • Spring Boot: create a Project
    • Spring Boot: H2 DB and Thymeleaf
    • Spring Boot: cycle

    • Spring Boot Concepts
    • Spring Boot: Dependency Injection
    • Spring Boot: Annotations
    • Spring Boot: Controller
    • Spring Boot: View
    • Spring Boot: Thymeleaf
    • Spring Boot: Vaadin Flow
    • Spring Boot: Vaadin Hilla
    • Spring Boot: Model
    • Spring Boot: Rest
    • Spring Boot: Data & DB
    • Spring Boot: JPA & DI
    • Spring Boot: JPA Mappings
    • Spring Boot: JPA Relationships
    • Spring Boot: JPA Queries
    • Spring Boot: JPA Inherence
    • Spring Boot: Scaling

    • Spring Boot Laboratories
    • Lab#SB00-1: Library UML
    • Lab#SB00-2: CRUD User
    • Lab#SB00-3: LibraryManagement
    • Lab#SB00-4: API Rest
    • Lab#SB00-5: Rest & JPA-H2
    • Lab#SB00-6: Rest & MongoDB
    • Lab#SB00-7: Styling
    • Lab#SB01-1: DataBase
    • Lab#SB02-1: JPA Relationships
    • Lab#SB03-1: APIs & cloud
    • Lab#SB04-1: JPA Inherence
    • Lab#SB05-1: API Rest
    • Lab#SB06-1: employeeCourse
    • Lab#SB07-1: monitor Book
    • Lab#SB08-1: Restaurant UML
    • Lab#SB08-2: Vaadin
    • Lab#SB08-3: H2 and API Rest
    • Lab#SB08-4: JPA
    • Lab#SB08-5: Test API Rest
    • Lab#SB09-1: SpringIO Conference

    • Spring Boot readings
    • Spring Boot Resources
  • ReactJS
    • ReactJS: Principles
    • React JS: Introduction
    • React JS: render virtual DOM
    • React JS: Create a React project
    • React JS: Components
    • React JS: JSX
    • React JS: props and state

    • JavaScript: web scripting
    • JavaScript: basics
    • JavaScript: functions
    • JavaScript: objects
    • JavaScript: variables
    • JavaScript: flux control

    • ES6: ECMAScript 6
    • React JS ES6: arrow functions
    • React JS ES6: import modules
    • React JS ES6: array, data and key
    • React JS ES6: destructuring
    • React JS ES6: spread operator

    • ReacJS 18: Hooks
    • React JS: Rules of Hooks
    • ReactJS: useState
    • React JS: useReducer
    • React JS: useRef
    • React JS: useEffect
    • React JS: useContext
    • ReactJS: useMemo
    • ReactJS: custom hooks

    • ReactJS: Designing an App
    • React JS App: async
    • React JS App: events
    • React JS App: router
    • React JS App: conditional render
    • React JS App: styling

    • React JS: Laboratories
    • Lab#RE01-1: API Rest Axios
    • Lab#RE02-1: Router & Hooks
    • Lab#RE03-1: to-do app
    • Lab#RE03-2: HighCharts
    • Lab#RE03-3: API Rest Mono
    • Lab#RE03-4: API Rest Domains
    • Lab#RE03-5: data management
    • Lab#RE04-1: todo & server
    • Lab#RE04-2: Spring Boot & ReactJS
    • Lab#RE05-1: chat & websockets
    • Lab#RE05-2: chat: backend
    • Lab#RE05-3: chat & AWS
    • Lab#RE05-4: chat: test ws AWS
    • Lab#RE05-5: chat & front
    • Lab#RE05-6: chat & ws: front
    • Lab#RE06-1: healthyFood Restaurant
    • Lab#RE06-1-PR: create a pull request
    • Lab#RE07-1: traffic lights simulation

    • React JS readings
    • ReactJS Resources
  • Learning
    • Vocabulary
    • General Vocabulary
    • SCRUM Vocabulary
    • DevOps Vocabulary
    • Java SE Vocabulay
    • Spring Boot Vocabulary
    • DataBase Vocabulary
    • ReactJS Vocabulary
    • Web Vocabulary

    • Learning
    • Useful Questions
    • Learning: tips
    • Writing
    • Taking Notes
    • Comments
    • Document
    • Auto-Evaluate

    • Books & Articles
    • Books
    • Articles

    • What is SCRUM
    • SCRUM Agile Methodology
    • Agile Manifesto & Values
    • SCRUM Guide

    • Scrum Steps
    • Meetings, Impediments and Iterations
    • User stories, Tasks and Habits
    • Delivering Value & Communication
    • ScrumMaster, how it works
    • Mindset, the key to everything
    • Product Owner, how it works
    • Managing Time & Mind
    • Team & the Specialist
    • Albertus’ Dilemma
    • Before SCRUM
    • Team Dynamics
    • Emotions and Thoughts
    • Decision Making and Intuition
    • Beyond SCRUM
    • Balances, atmosphere and tools

    • Resources
    • SCRUM Resources
  • QGIS
    • QGIS basics
    • QGIS: basic concepts

    • QGIS laboratories
    • QGIS Laboratory 1: Introduction to Open Source GIS
  • ArcGIS Pro
    • ArcGIS Pro basics
    • ArcGIS Pro: basic concepts

    • ArcGIS Pro laboratories
    • ArcGIS Pro Laboratory 1: Getting Started
  • Bookmarks
    • Online Resources
    • Online Resources
  • About
    • About me and this site
    • About me
    • About this site
    • About images credit
  • Email
  • GitHub
  • LinkedIn
  1. Version Control
  2. Git and GitHub 2023 CLI
  • DevOps

  • What is DevOps
    • DevOps: Introduction
    • DevOps: Agile and Microservices
    • Infrastructure as code (IaC)
    • Immutable Infrastructure
    • Software Lifecycle

  • Documentation
    • How to document: Quarto and Obsidian

  • Network protocols
    • Network: Basics
    • Network: Client-server
    • Network Protocols
    • Network: DNS
    • Network: API Rest
    • Network: gRPC
    • Network: Websocket
    • Network: SMTP
    • Network: Ping
    • Network: UDP
    • Network: webhook
    • Network: SOAP
    • Network: graphQL

  • Version Control
    • Git
    • GitHub
    • Idea and GitHub 2023
    • Git and GitHub 2023 CLI

  • IDEs
    • IDE: Visual Code
    • IDE: IntellJIdea

  • DevOps tools
    • Amazon Web Services AWS
    • Docker
    • Jenkins pipelines
    • Kubernetes k8s
    • Digital Ocean
    • Nagios
    • Ansible

  • DevOps Laboratories
    • Lab 1: chat App
    • Lab 2: Spring Boot AWS AEB manually
    • Lab 3: Spring Boot and AWS S3 publisher
    • Lab 4: Spring Boot Docker/Jenkins
    • Lab 5: k8s on Digital Ocean
    • Lab 6: Spring Boot AWS codecommit

  • DevOps readings
    • DevOps Resources

On this page

  • 1 Overview: how with CLI create local and remote repo and commit/push
  • 2 Set up tools
  • 3 Create local/remote repos and first commit/push
    • 3.1 Step1: Initialization local repo
    • 3.2 Step2: Adding Files
    • 3.3 Step3: GitHub remote Repo
    • 3.4 Step4: Commit
    • 3.5 Step5: Link Local to Remote
    • 3.6 Step6: Push
  • 4 pull/fetch
    • 4.1 git pull
    • 4.2 git fetch
  • Edit this page
  • Report an issue
  1. Version Control
  2. Git and GitHub 2023 CLI

Git and GitHub 2023 CLI

Software code version control

devops
github
GitHub is a software development platform in the cloud. It’s used for storing, tracking, and collaborating on software projects.
Author

albertprofe

Published

Monday, October 16, 2023

Modified

Sunday, August 10, 2025

1 Overview: how with CLI create local and remote repo and commit/push

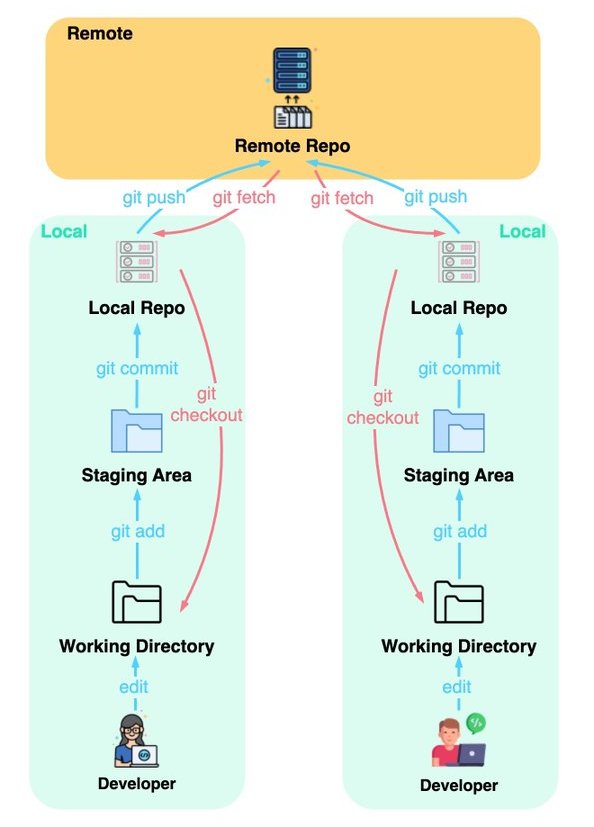
In the fast-paced world of software development, collaborating with remote teams and utilizing version control systems like GitHub has become an indispensable part of the process of software devolopment.

Working with a remote repository and daily commits via CLI is vital in modern software development. It fosters collaboration, streamlines version control, and encourages best practices.

  1. Collaboration: Remote repos enable seamless teamwork by providing a shared codebase.
  2. Version Control: Daily commits maintain a clear history, aiding debugging and change tracking.
  3. Backup: The remote repo serves as a backup, safeguarding your work.
  4. Code Quality: Regular commits promote modular, well-documented code and best practices.
  5. CI/CD: Automated testing and deployment are triggered by code commits.
  6. Remote Work: Facilitates remote work and flexible development.
  7. Documentation: Commit messages document changes and aid in understanding code history.
  8. Code Review: Daily commits simplify code reviews and collaboration.
  9. Learning: A consistent opportunity for learning and growth through commit history analysis.

2 Set up tools

  • GitHub account
  • Install git local
  • Permssion to write GitHub
  • CLI gh

How does git work What makes Git so popular? How does it work?

How does git work What makes Git so popular? How does it work?

3 Create local/remote repos and first commit/push

In these six steps, you’re setting up and pushing a project to a remote GitHub repository.

  • Firstly, you initialize a local Git repository with git init, creating a version control system.
  • Then, you stage all changes with git add –all, preparing them for commit.
  • In step 3, you use the GitHub CLI to create a new public repository on GitHub.
  • Step 4 involves committing your changes with git commit –all, accompanied by a commit message.
  • In step 5, you set up a connection to the remote repository using git remote add origin.
  • Finally, you push your local changes to GitHub with git push origin master, effectively syncing your local and remote repositories.

3.1 Step1: Initialization local repo

albert@albert-virtual-machine:~/Desktop/git$ git init
Initialized empty Git repository in /home/albert/Desktop/git/.git/

In this initial step, you’re initializing a new Git repository on your local machine.

Initializing a new Git repository

Initializing a new Git repository

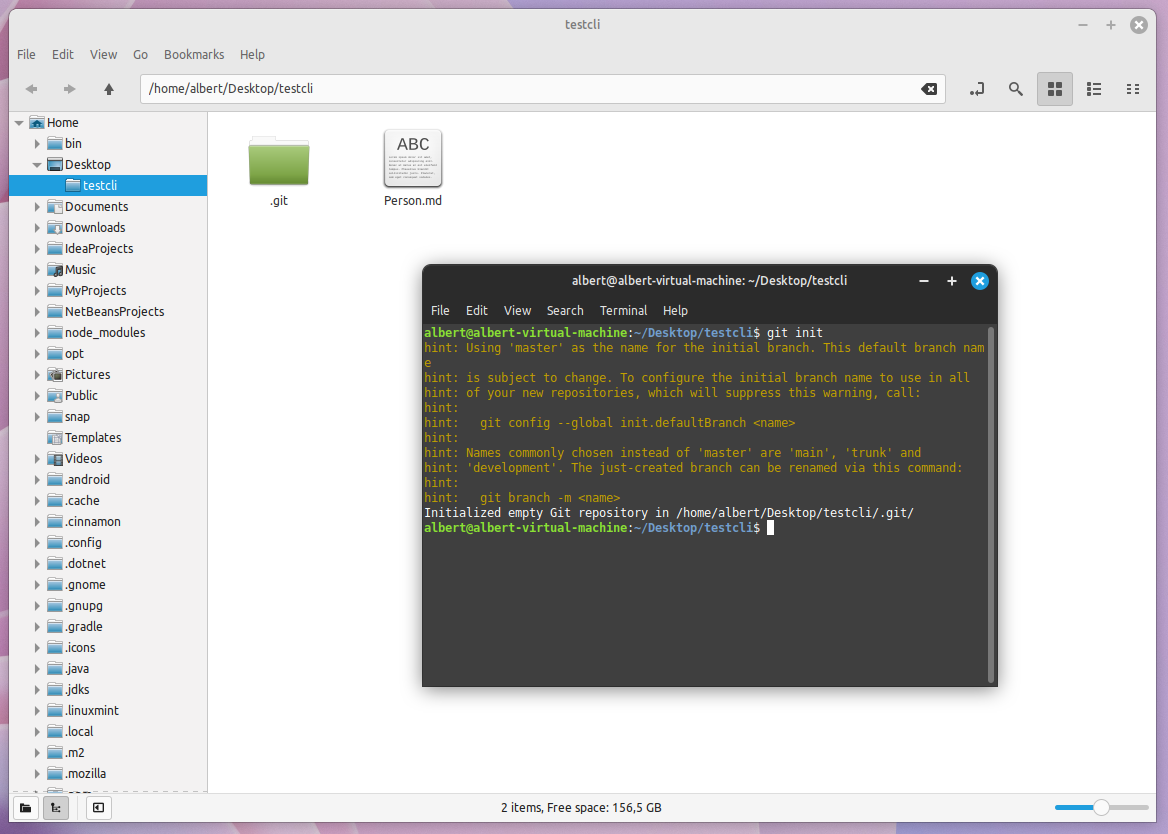
The command git init is used to create an empty Git repository. After executing this command, Git responds with a message indicating that it has successfully initialized an empty repository in the specified directory, which in this case is /home/albert/Desktop/git/.git/.

This means you’ve set up a local Git repository on your computer where you can start tracking and versioning your project.

3.2 Step2: Adding Files

albert@albert-virtual-machine:~/Desktop/git$ git add --all

--all or dot (.)

  • add . or add * indexes all the new and modified files and stages them for a commit, except for the files that have been removed.

  • add -u stages all modified and removed files for a commit, except for the new files created.

  • add -A or add –all is a combination of both add . & add -u. It will add all new files, modified files and removed files, for staging.

git add * (asterisk) vs git add . (period)

In this step, you’re using the git add –all command to stage all the changes in your working directory for the next commit.

Staging means you’re telling Git which files you want to include in the next commit.

By using the –all option, you’re adding all changes, including new files, modifications, and deletions, to the staging area.

3.3 Step3: GitHub remote Repo

albert@albert-virtual-machine:~/Desktop/git$ gh repo create testcli --public
✓ Created repository AlbertProfe/testcli on GitHub

Here, you’re creating a new GitHub repository named “testcli” and making it public using the GitHub CLI (gh).

Creating a new GitHub repository named “testcli”

Creating a new GitHub repository named “testcli”

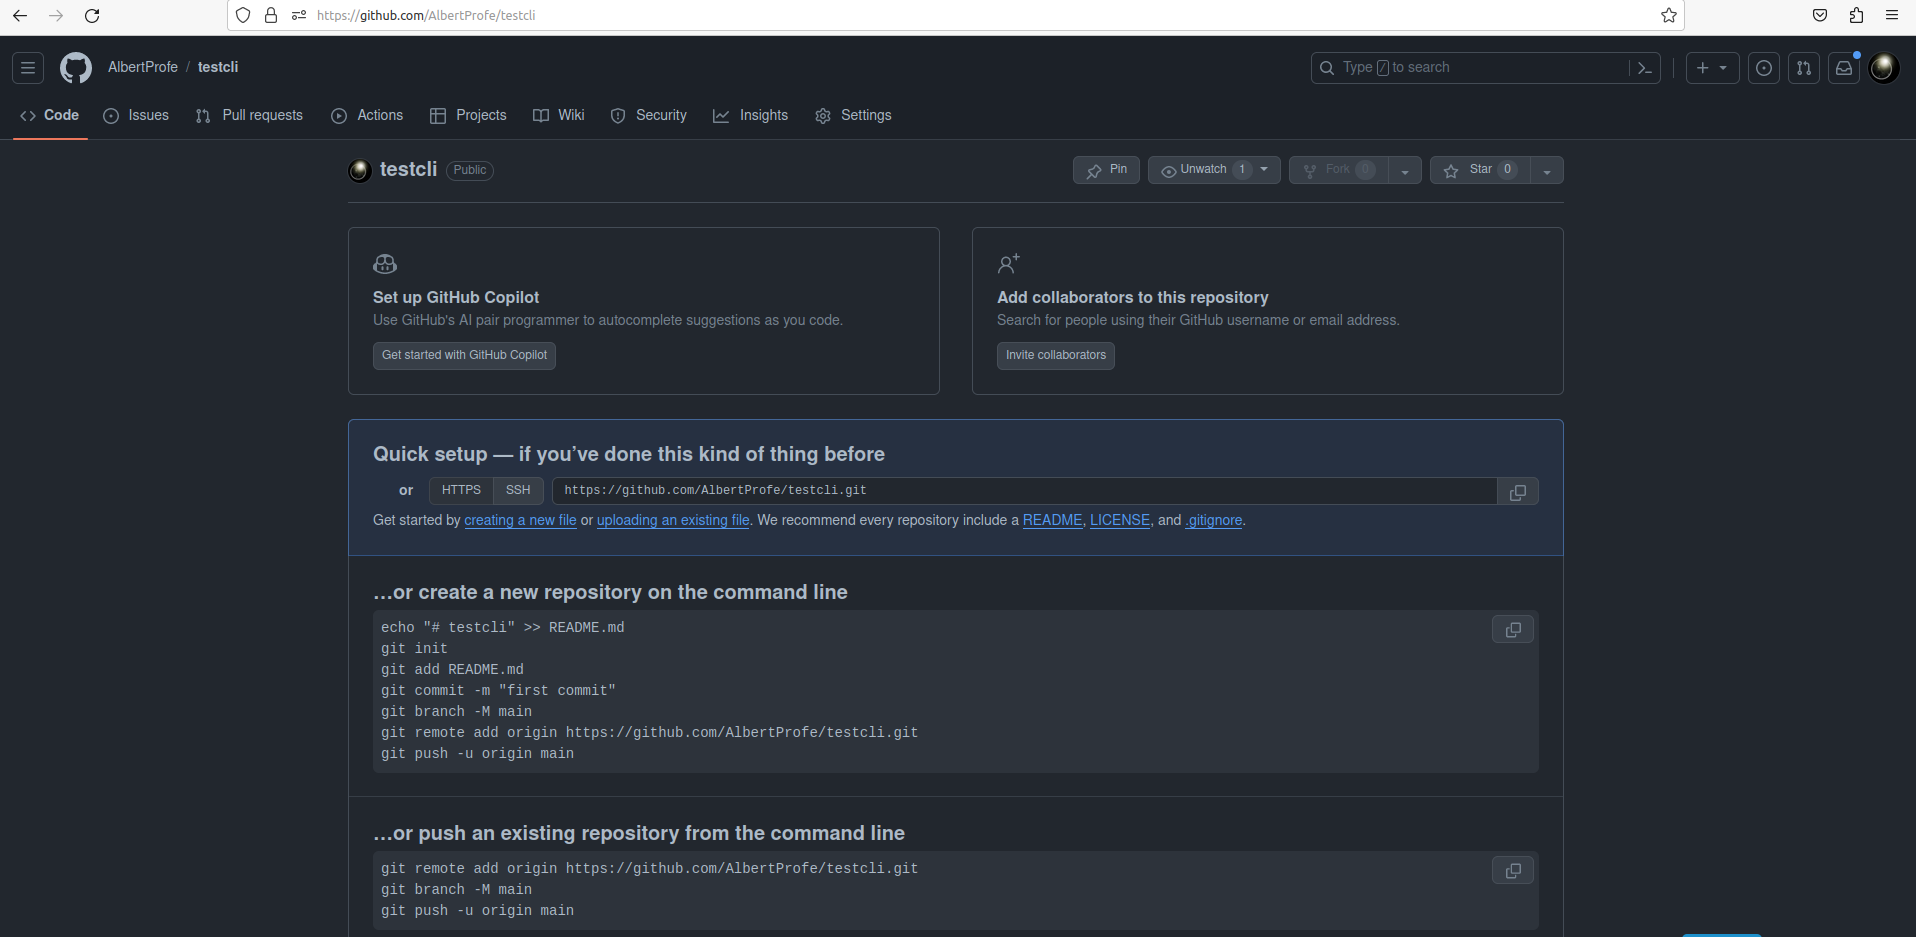
The command gh repo create testcli –public initiates the repository creation process.

After successful execution, you receive a confirmation message that the repository “AlbertProfe/testcli” has been created on GitHub.

3.4 Step4: Commit

git commit --all
[master (root-commit) 0afa074] hi
 1 file changed, 2 insertions(+)
 create mode 100644 person.md

With this step, you’ve committed your changes to the local Git repository.

The command git commit –all has committed your staged changes with a commit message “hi.”

The response from Git shows that one file was changed, adding two insertions, and a new file named “person.md” was created.

3.5 Step5: Link Local to Remote

albert@albert-virtual-machine:~/Desktop/git$ git remote add origin https://github.com/AlbertProfe/testcli.git

You’re setting the remote repository for your local Git repository.

The command git remote add origin https://github.com/AlbertProfe/testcli.git associates your local Git repository with the GitHub repository you created earlier.

This allows you to push your local commits to the remote repository on GitHub.

3.6 Step6: Push

albert@albert-virtual-machine:~/Desktop/git$ git push origin master
Enumerating objects: 3, done.
Counting objects: 100% (3/3), done.
Writing objects: 100% (3/3), 218 bytes | 109.00 KiB/s, done.
Total 3 (delta 0), reused 0 (delta 0), pack-reused 0
To https://github.com/AlbertProfe/testcli.git
 * [new branch]      master -> master

In the final step, you’re pushing your local commits to the remote repository on GitHub. The command git push origin master sends your changes to the “master” branch of the remote repository.

Git enumerates the objects, counts them, and writes them to the remote repository, effectively updating the GitHub repository with your local changes.

The output shows the progress and confirms that the “master” branch on GitHub has been updated with the changes from your local repository.

4 pull/fetch

git pull and git fetch are two commonly used commands for updating your local repository with changes from a remote repository. They serve similar purposes but work in slightly different ways.

4.1 git pull

git pull is a combination of two operations: git fetch followed by git merge.

When you run git pull, Git fetches the changes from the remote repository and then automatically merges them into your local branch.

This can be convenient for a quick update but may lead to automatic merges, potentially resulting in conflicts that you need to resolve.

git pull origin main

4.2 git fetch

git fetch only fetches changes from the remote repository but does not automatically merge them into your local branch.

This is useful when you want to inspect the changes before integrating them into your branch. It allows you to review the changes and decide when and how to merge them.

git fetch origin
Back to top
Idea and GitHub 2023

This website is built with Quarto.

Difficulties are just things to overcome, after all. Ernest Shackleton

  • Edit this page
  • Report an issue